Building a tiny house on a shoestring budget sounds like a fairy tale, until you realize it’s possible with ruthless planning and creative sourcing. A $500 tiny house isn’t a furnished, move-in-ready dwelling: it’s a weathertight shelter built primarily from salvaged materials, sweat equity, and smart design choices. This guide walks through realistic strategies, material sourcing tactics, and construction methods that can actually get you there. Whether you’re building a backyard studio, a guest cabin, or testing the tiny house lifestyle, these approaches prioritize function over finish and materials over labor costs.
Table of Contents
ToggleKey Takeaways
- Building a tiny house for $500 is realistic when you source 80% of materials for free from salvage yards, demolition sites, and community groups like Buy Nothing, then budget only for essentials like roofing and fasteners.
- A $500 tiny house build requires 100–150 square feet of space, DIY labor, permanent foundation placement, and acceptance of minimal finishes like no drywall or appliances.
- Maximize material savings by using salvaged 2×4s for framing, corrugated metal roofing, straw insulation, and recycled windows sourced from local contractors, estate sales, and Habitat for Humanity ReStore locations.
- Simplify your tiny house design with a shed roof, single door, two small windows, and open-plan interior to minimize material waste and labor costs while maintaining structural safety.
- Verify building permits and zoning compliance with your local building department before starting, as structural work and electrical installations may require licensed professionals or permits despite your low budget.
- Leverage community labor through group builds with friends and neighbors—framing a tiny house in 3–4 weekends with 10–15 volunteers dramatically reduces per-person costs and construction time.
Is Building A Tiny House For $500 Realistic?
Yes, with significant caveats. A $500 tiny house means you’re building roughly 100–150 square feet of shelter, relying almost entirely on salvaged or free materials, and doing all labor yourself. This isn’t comparable to commercially built tiny homes costing $25,000–$60,000. You’re also likely building on land you already own, avoiding site acquisition and permitting costs.
The math breaks down roughly like this: if you source 80% of materials for free (reclaimed wood, old windows, salvaged siding) and buy only essentials, fasteners, insulation, roofing, you can stay under $500. Skip the tiny house on a trailer foundation: build on a permanent or semi-permanent pad instead. Avoid finishes: drywall, hardwood, cabinetry, and appliances come later or not at all.
Building permits and zoning compliance vary wildly by jurisdiction. Some counties allow accessory dwelling units (ADUs) or backyard structures under 120 square feet without permits: others require full inspections. Before you dig, contact your local building department. Structural work and electrical installations may need permits or licensed professionals, don’t skip this step. Even a budget build needs to be safe and legal.
Source Free And Reclaimed Materials
Sourcing is the linchpin of a $500 build. Without free or deeply discounted materials, you’ll blow your budget on lumber alone. Plan to spend 2–4 weeks hunting before you break ground. Budget stores, online marketplaces, and construction sites are goldmines if you know where to look.
Start with Craigslist, Facebook Marketplace, and local Buy Nothing groups. Post a want ad: “Looking for reclaimed lumber, old windows, scrap siding for tiny house project.” You’ll be shocked what people give away. Estate sales, property cleanouts, and demolition projects yield massive quantities of usable material. Many contractors demolishing houses or decks will deliver materials free if you haul them away, this is exactly what you want.
Local salvage yards and architectural salvage shops stock windows, doors, and period wood at a fraction of retail. Yes, you’ll pay something here, but $2–5 per window beats $25–50 new. Building material reclamation centers (run by nonprofits in some areas) offer similar deals.
Don’t overlook pallets. Free wooden pallets are everywhere, behind retail stores, warehouses, and loading docks. Inspect them for chemical markings (avoid HT-treated pallets used for hazardous materials), then disassemble and use as framing lumber or subfloor material. A dozen pallets can yield enough 2×4 equivalent for small walls.
Where To Find Salvaged Building Materials
Local demolition and construction sites: Call contractors doing tear-downs and ask if you can salvage. Offer to haul away material they’d otherwise pay to dump, win-win.
Habitat for Humanity ReStore locations: These nonprofit thrift shops sell donated building materials, fixtures, and tools at 30–50% below retail. Stock varies by location, so visit weekly.
Craigslist Free section and Facebook Marketplace: Search “free lumber,” “free windows,” “free siding.” Filter for “free” listings and be ready to pick up fast.
Buy Nothing groups: Join your neighborhood Buy Nothing Facebook group. Post what you need and wait. Many people happily give away building scraps.
Estate sales and property cleanouts: Attend local estate sales or contact property managers handling cleanouts. Old barns, sheds, and renovation debris often include solid wood beams and framing lumber.
Pallet reclamation: Walk around industrial areas, warehouses, and big-box retailers. Pallets are often left curbside. Ask permission before taking them. Step-by-step DIY tutorials show how to safely disassemble and prep pallets for reuse.
Design For Extreme Efficiency
Design directly impacts your material bill and build time. A 120-square-foot footprint (roughly 10×12 feet) is workable for a single occupant or couple. Tall walls waste material: a 7–8 foot interior height is adequate. Reduce the number of windows and doors, each one is an opening that needs flashing, framing, and thermal insulation.
Choose a simple shed roof or single-slope design over a gable. Gables require more framing lumber and roofing material. A simple shed roof with a 4:12 pitch drains water efficiently and uses less material. One door, two small windows, and one vent minimize openings.
Stack functions vertically. A lofted sleeping area lets you use 120 square feet for living and sleeping without building wider or longer. Use built-in benches and shelving instead of furniture, this saves money and space. A simple composting toilet (or portage to an existing septic system) eliminates expensive plumbing.
Keep the interior an open plan. Load-bearing walls increase material and labor. If structural support is needed, use a single central beam and posts rather than multiple walls. Minimal interior partition means less framing, drywall, and finishing. This is functional, not cozy, accept the trade-off.
DIY Construction Methods That Save Money
Where you can’t get free materials, you buy smart and build efficiently. Standard lumber prices fluctuate: salvaged wood costs nothing. Roofing is expensive: corrugated metal roofing or recycled asphalt shingles (sold by the pound at salvage yards) are budget-friendly alternatives.
Framing: Use salvaged 2×4s for your stud walls. If you’re mixing materials (some new, some old), buy only what gaps remain. A 10×12 shed needs roughly 300 linear feet of 2×4 lumber. If you source 240 feet free, buy only 60, cutting your framing cost from $200+ down to $50–75.
Roof: Metal roofing panels (corrugated steel or aluminum) run $0.50–1.50 per square foot used: new shingles cost $1–2 per square foot. For a 150-square-foot roof, metal saves $75–225 vs. shingles. Roof felt and flashing are non-negotiable, these prevent leaks that cost far more to repair.
Insulation: Open-cell foam or cellulose costs $1–2 per square foot. Salvage yields fiberglass batts for free. Bales of straw (not hay, which attracts pests) run $5–10 each, straw walls provide R-value and use fewer expensive materials. Plan for 2–4 inches of insulation in walls, 6–8 inches in roof.
Electrical: If you’re not licensed, hire a licensed electrician for the rough-in and final inspection. Breaker panel, wiring, and outlets are non-negotiable safety items. A simple 100-amp subpanel costs $300–500 installed. Budget $500–800 for basic electrical if you DIY under supervision: more if you hire professional installation.
Foundation: A compacted gravel pad with a concrete pier foundation costs $50–150 in materials and avoids expensive footers. Blocks set on a frost-proof footing (below local frost line) work in most climates. Consult your local building code, frost depth varies.
Use hand tools where possible. A circular saw and miter saw are fine: they cost less than a table saw and take up less space. A power drill, level, and tape measure are essentials. Borrow or rent expensive tools (scaffolding, nail guns, boom lifts) by the day rather than buying.
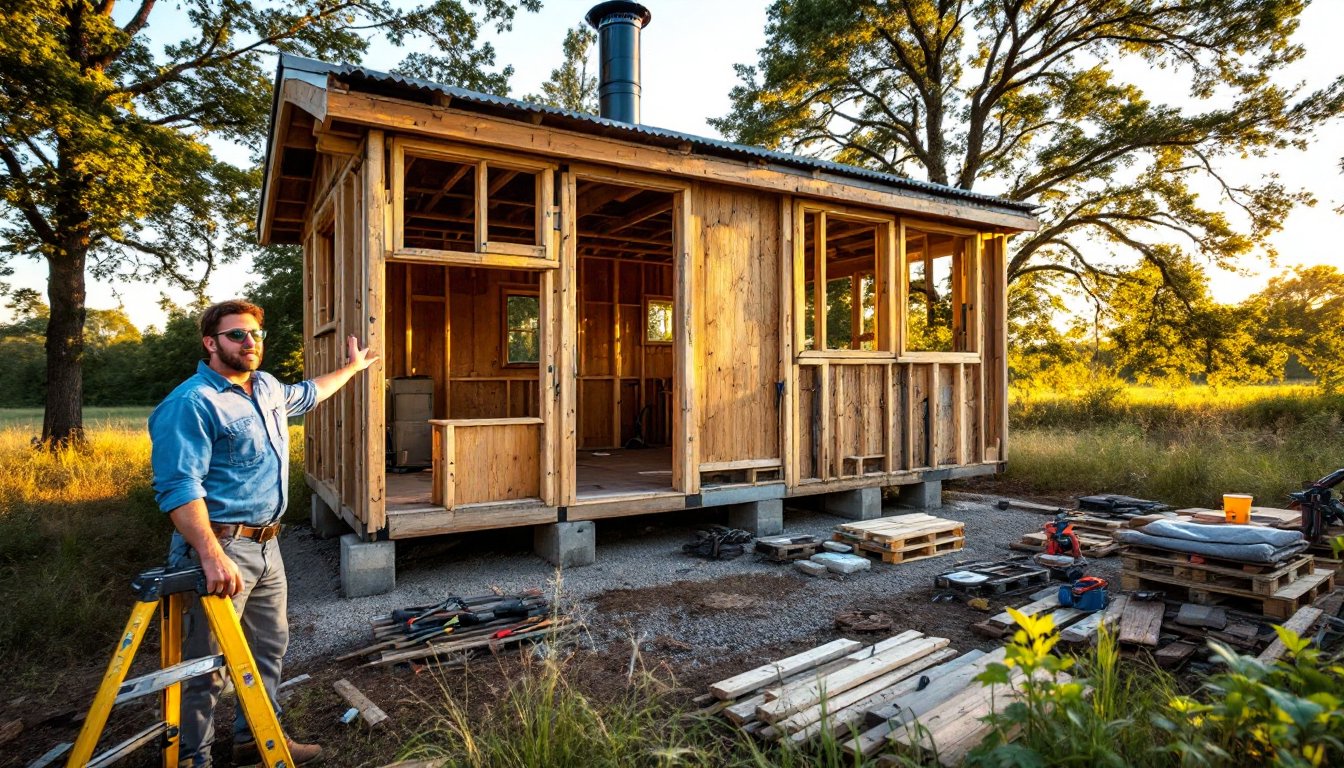
Roll up sleeves and assume all labor is yours. Professional framing costs $5–15 per square foot: DIY costs almost nothing beyond material. Roofing, siding, and exterior finishing labor is steep. You’ll do most work yourself or trade skills with friends, a classic barn-raising approach.
Real Examples And Project Stories
Tiny house builders have documented their low-budget builds online. Ana White’s free tiny house plans include a rough cost breakdown: her 400-square-foot tiny house on a trailer foundation came to roughly $3,000–4,000 in materials (no labor, extensively salvaged). Scaling down to 120 square feet with maximal salvage, a $500 budget becomes plausible.
One builder in rural Pennsylvania completed a 100-square-foot backyard cabin for under $400 by sourcing materials from a demolition site. Reclaimed 2×6 framing, barn siding, and old windows were free. New roofing, fasteners, and concrete foundation pad cost $380. The structure is weathertight, insulated with salvaged fiberglass, and heated with a small wood stove, entirely within budget.
Another approach: partnering with others. A group build (10–15 people working weekends) can frame a tiny house in 3–4 weekends. House hacking concepts show people are reducing housing costs through creative living arrangements: building low-cost shelter is part of that spectrum. When labor is shared, cost per person plummets.
Research platforms like Instructables show detailed tiny house builds, many with material lists and cost breakdowns. Many builders started with budgets under $1,000 and adapted as they sourced materials. The lesson: start with free/salvage, fill gaps with budget purchases, and don’t chase perfection.
Conclusion
A $500 tiny house is achievable if you accept limitations: no finishes, minimal systems, salvaged materials, and relentless DIY effort. The real value isn’t a finished product, it’s the learning experience and proving that shelter can be simple and cheap. Start with accurate measurements, solid sourcing, and a clear permit status. Use proven designs, salvage aggressively, and don’t cut corners on structural integrity or safety. Your timeline is longer: your cost is dramatically lower. That’s the trade-off.